Thor's Lightning
Jeep® Thor’s Lightning Rapid 4-Tire Air System | 300 PSI Braided Hose
★★★★★ 4.6 · 8 reviewsComplete Your Setup
Get the compressor, mount, wiring, and 4-tire system matched to your vehicle.
 Paquete de compresor de aire personalizable
Build Yours →
Paquete de compresor de aire personalizable
Build Yours →
 Ultimate Air Bundle: Ford Bronco 4-Door Hardtop (...
$1,080.97
Ultimate Air Bundle: Ford Bronco 4-Door Hardtop (...
$1,080.97
 Ultimate Air Bundle: Ford Bronco 4-Door Soft-top ...
$1,080.97
Ultimate Air Bundle: Ford Bronco 4-Door Soft-top ...
$1,080.97
Details
Jeep® Thor’s Lightning Rapid 4-Tire Air System
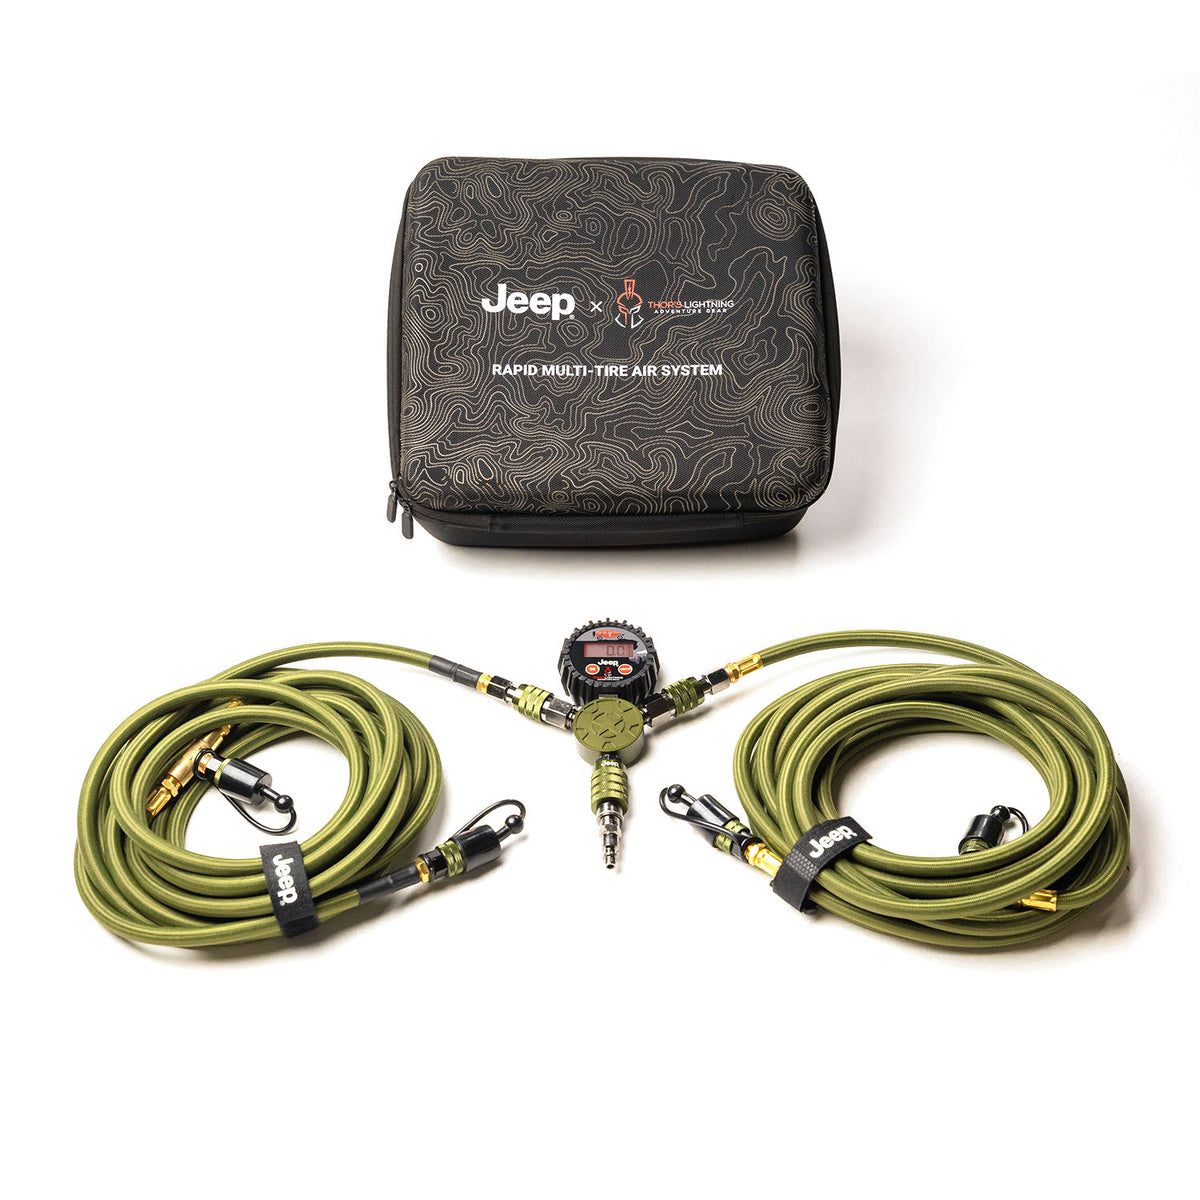
An officially licensed Jeep® four-tire inflation and deflation system designed to connect all four tires to one central manifold. Built for Jeep owners who air down for trails and need a fast, organized way to inflate, deflate, monitor, and equalize tire pressure.
- Hose length: 23.5 feet per side
- Maximum operating pressure: 300 PSI
- Hose construction: braided hybrid rubber/PVC hose designed for hot and cold conditions
- Connections: industrial I/M quick disconnects
- Storage: heavy-duty 18 x 10 x 5 in. MOLLE-compatible carrying bag
- Best for: Jeep trail use, airing down, reinflation, and pressure equalization
Air compressor sold separately unless purchased as part of a bundle.
Air Up Fast. Hit the Trail Hard.
Take full control of all four tires. Fast. Reliable. Built to perform in the toughest conditions.
Key Features:
-
Hammer Manifold
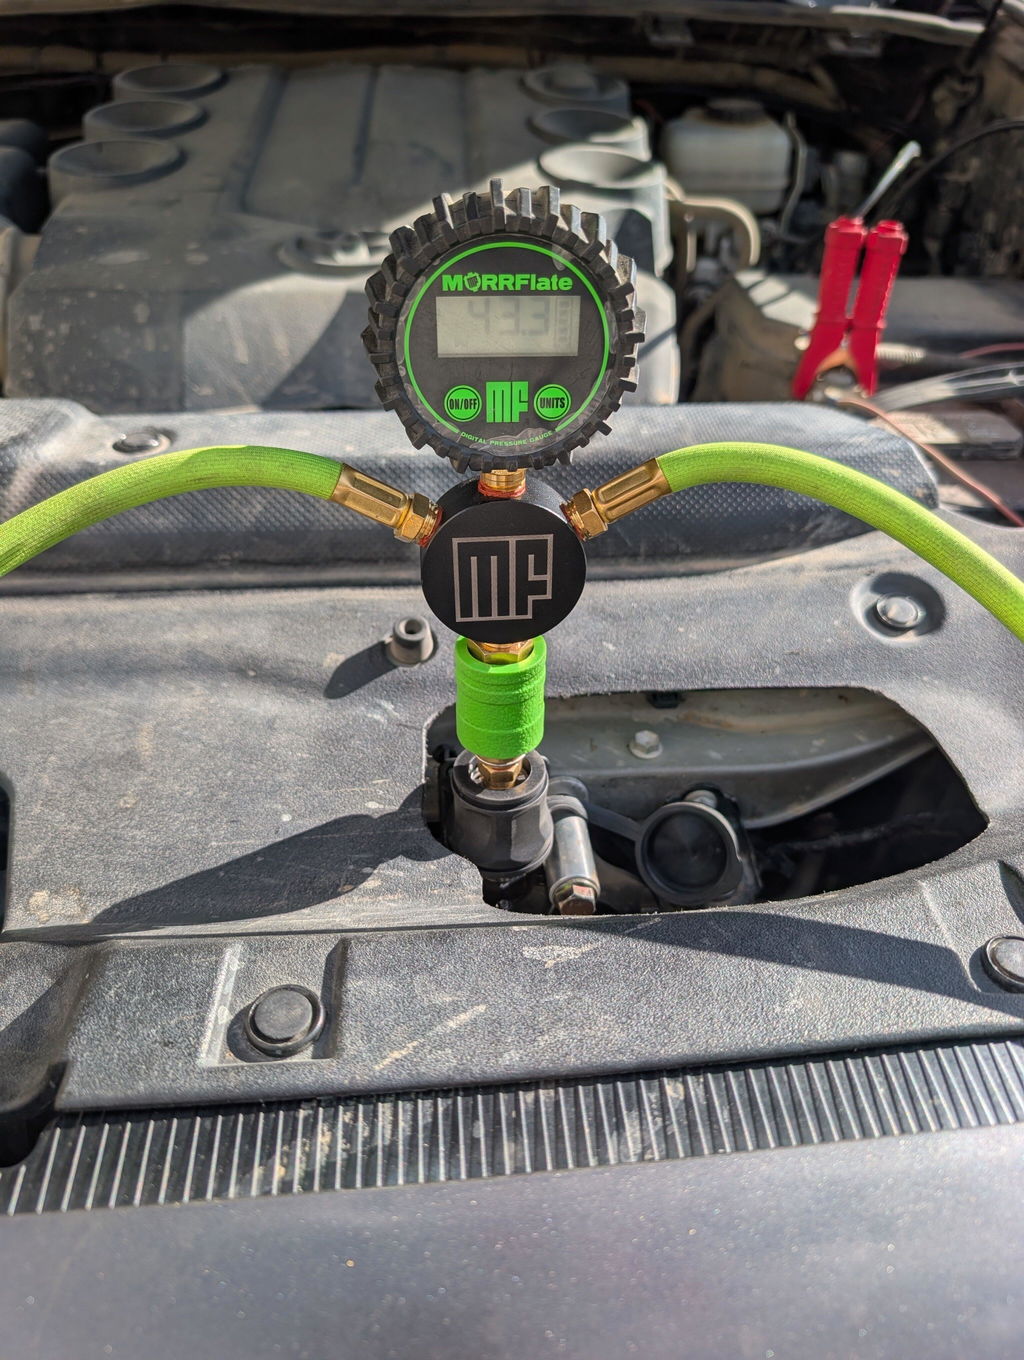
One rugged hub with a digital gauge, ball valve, and I/M quick disconnects. Finished with the Jeep® Star Heritage Mark™ as a nod to Jeep’s WWII origins. -
Cool Touch Braided Hoses
Stay cool under pressure. Hybrid rubber and PVC core stays flexible in any weather. -
High-Flow Path
Oversized internal fittings maximize airflow for faster tire fills. -
Fast Connect
Premium quick disconnects make setup and teardown fast and easy. -
Field-Ready Storage
Heavy-duty zippered nylon bag with MOLLE straps for secure storage and transport.
Heritage Meets Performance
This system is fast, rugged, and ready for the wild. Built for serious off-road use with design details that honor Jeep® history.
Tech Specs
-
Hose length: 23.5 ft each (2 total)
-
CoolTouch™ braided sheath with hybrid core
-
I/M industrial quick disconnects
-
Bag: 18 x 10 x 5 inches, MOLLE-compatible
-
Max operating pressure: 300 PSI
Built for the Jeep® Vehicle Life. Ready When You Are.
Air down. Power up. Take control with the Jeep® Rapid Multi-Tire Air System.

Shipping & Returns
Warranty
We value your satisfaction with Thor's Lightning Air Systems and its products. If you aren't satisfied with your product, we want to make it right.
Returns
Our refund and returns policy lasts 90 days. If 90 days have passed since your purchase, we can't offer you a full refund or exchange.
To be eligible for a return, your item must be returned with all components that were included in the order. Your item must also be free of wear/tear, any cosmetic defects and in good working order.
To complete your return, we require a receipt or proof of purchase.
Once your return is received and inspected, we will send you an email to notify you that we have received your returned item. We will also notify you of the approval or rejection of your refund. If you are approved, then your refund will be processed, and a credit will automatically be applied to your credit card or original method of payment, within a certain amount of days.
Late or missing refunds
If you haven't received a refund yet, first check your bank account again. Then contact your credit card company, it may take some time before your refund is officially posted. Next contact your bank. There is often some processing time before a refund is posted. If you've done all of this and you still have not received your refund yet, please contact us at returns@thorslightning.com.
Sale items
Only regular priced items may be refunded. Sale items cannot be refunded.
Shipping Returns
To return your product, you should mail your product to:
Fountain Lake OutfittersC/O Thor's Lightning Returns Dept.
919 W. Main St. Suite B
Albert Lea, MN 56007
You will be responsible for paying for your own shipping costs for returning your item. Shipping costs are non-refundable. Depending on where you live, the time it may take for your exchanged product to reach you may vary.
If you are returning more expensive items, you may consider using a trackable shipping service or purchasing shipping insurance. We don't guarantee that we will receive your returned item.
Limited Warranty
Duration: 3 years from the date of purchase by the original Purchaser.
Who gives this warranty (Warrantor): Thor's Lightning, 919 W. Main St. Suite B, Albert Lea, MN 56007
Who receives this warranty (Purchaser): The original Purchaser (other than for purpose of resale)
What products are covered by this warranty: Thor's Lightning Air System tire pressure inflation/deflation/equalization device and/or Thor's Lightning Compressor Mounting Bracket and/or Thor's Lightning Air Compressors.
What is covered under this warranty: Manufacturer defects due to material and/or workmanship with the exceptions noted below.
What is not covered under this warranty
- The cost of labor to make repairs or replacements
- Any failure that results from Purchaser's abuse, neglect or failure to operate, maintain or service product in accordance with instructions provided in the owner's manual(s) supplied
- Any damage caused by using equipment beyond rated capacity and/or capability
- Items or service normally required to maintain the product
- Items considered general wear parts such as hoses, etc. unless wear or failure is a direct result of manufacturer defect due to material and/or workmanship
- Any component damaged in shipment or any failure caused by installing or operating equipment under conditions not in accordance with installation and operation guidelines or damaged by contact with tools or surroundings
- Any component failure caused by rain, excessive humidity, corrosive environments or other contaminants
- Worn components due to improper maintenance or corrosive environments
- Cosmetic defects that do not interfere with product functionality
- Damage due to incorrect voltage or improper wiring
- Any incidental, indirect, or consequential loss, damage, or expense that may result from any defect, failure, or malfunction of a Thor's Lightning product
Responsibilities of Warrantor under this warranty
Repair or replace with either new or reconditioned unit at Warrantor's option, component and/or unit which is defective, has malfunctioned and/or failed to conform within duration of the warranty period.
Responsibilities of Purchaser under this warranty
- Provide dated proof of purchase and maintenance records
- Freight costs must be borne by the Purchaser.
- Use reasonable care in the operation and maintenance of the products as described in the owner's manual(s).
When Warrantor will perform repair or replacement under this warranty
Repair or replacement will be scheduled and serviced according to the normal work flow at the servicing location, and depending on the availability of replacement parts.
Limitation of Liability
Thor's Lightning shall have no obligation pursuant to this Warranty with respect to products which in our sole judgment have been altered damaged, misused, abused, badly worn, lost or improperly maintained. This Warranty is null and void if the customer or any other person other than an authorized representative of Thor's Lightning has made any attempt to service or modify the tool prior to its return to Thor's Lightning under this Warranty. In no event will either party be liable for any damage caused by the other party's failure to fulfill its responsibilities under these terms and conditions. In no event will either party be liable for any lost profits, lost savings, incidental damage, or other economic consequential damages Thor's Lightning products are provided and sold as is without any express or implied warranties including warranties of merchantability or fitness for particular purpose. No warranties, expressed or implied, will apply after this period. Thor's Lightning may modify these terms and conditions at any time by either providing the customer with written notice or posting such revised terms on Thor's Lightning website. Such revised terms shall be effective thirty days from the date of such written notice or posting.
Register Your Warranty
Register your purchase so we can help you faster if you ever need warranty service.
Need help?
Questions about refunds and returns: returns@thorslightning.com
Everything else: Contact us
Installation Instructions
Desplácese hacia abajo para ver videos útiles e instrucciones escritas para nuestros productos. Si necesita ayuda adicional, envíenos un correo electrónico a sales@thorslightning.com o llámenos al 720-797-9784.
Deflación:
- Paso 1: Desempaque las mangueras. Hay dos secciones de manguera largas, una para cada lado del vehículo. Hay un colector equipado con dos acopladores de desconexión rápida para las dos secciones de manguera largas. Oriente las mangueras de modo que el colector sea accesible para su fuente de aire.
- Paso 2: Conecte la manguera al colector mediante los acopladores de desconexión rápida (si es necesario). Asegúrese de que la válvula de aire (mango negro) esté paralela al suelo (esto cierra la válvula).
- Paso 3: Conecte secciones largas de manguera a los vástagos de las válvulas de los neumáticos del vehículo utilizando los portabrocas de desconexión rápida. Asegúrese de que no haya torceduras en la manguera.
- Paso 4: Después de conectar las secciones largas de manguera a todos los neumáticos que deben desinflarse, abra la válvula de aire girando la manija negra hasta colocarla perpendicular al suelo. Cierre la válvula y verifique el manómetro de aire digital para ver qué presión de aire tienen actualmente los neumáticos. Abra y cierre la válvula según sea necesario hasta alcanzar la presión de aire deseada.
- Paso 5: Deje el sistema de aire conectado a las 4 llantas durante aproximadamente 10 a 15 segundos con la válvula en la posición cerrada; esto permite que las 4 llantas igualen su presión.
Inflación:
- Paso 1: Desempaque las mangueras. Hay dos secciones de manguera largas, una para cada lado del vehículo. Hay un colector equipado con dos acopladores de desconexión rápida para las dos secciones de manguera largas. Oriente las mangueras de modo que el colector sea accesible para su fuente de aire.
- Paso 2: Conecte la manguera al colector mediante los acopladores de desconexión rápida (si es necesario). Asegúrese de que la válvula de aire (mango negro) esté paralela al suelo (esto cierra la válvula).
- Paso 3: Conecte secciones largas de manguera a los vástagos de las válvulas de los neumáticos del vehículo utilizando los portabrocas de desconexión rápida. Asegúrese de que no haya torceduras en la manguera.
- Paso 4: Conecte el acoplador del colector a la fuente de aire. Nota: si está utilizando un compresor SmittyBuilt/Maxi-Trac/Lightning Bolt o Viair, necesitará el acoplador opcional Thor's Lightning Air System. Una vez que el acoplador esté conectado a la fuente de aire, abra la válvula de aire girando la manija negra hasta quedar perpendicular al suelo. Si no se abre la válvula de aire, la fuente de aire puede fallar debido a la contrapresión.
- Paso 5: enciende la fuente de aire. Apague la fuente de aire y verifique el manómetro de aire digital para ver qué presión de aire tienen actualmente los neumáticos. Encienda y apague la fuente de aire según sea necesario hasta alcanzar la presión de aire deseada.
- Paso 6: Deje el sistema de aire conectado a las 4 llantas durante aproximadamente 10 a 15 segundos con la válvula en la posición cerrada; esto permite que las 4 llantas igualen su presión.
NOTA: Si utiliza una fuente de aire comprimido de CO2 (tanque de energía), se recomienda no exceder los 200 psi de presión en el regulador para evitar fugas, a menos que se haya comprado una actualización del manómetro de alta presión de 250 psi.
Video instructivo del colector Lightning Hammer
Si el medidor digital parece tener una lectura alta o baja, recalibre el medidor quitando y reinstalando las baterías AAA dentro del medidor. Si eso no funciona, el medidor se puede recalibrar mediante el siguiente procedimiento:
1. Cuando el manómetro esté sin presión de aire, retire la batería y luego vuelva a instalarla.
2. Mantenga presionados ambos botones (ON y UNITS) al mismo tiempo durante aproximadamente 5 segundos hasta que la pantalla muestre "-80".
3. Cuando aparezca -80, infle el manómetro a 80 psi: no agregue presión de aire lentamente, debe agregarse a 80 PSI rápidamente.
4. Si la pantalla muestra "aprobado", el manómetro se recalibra correctamente.
5. Luego retire y vuelva a instalar las baterías en el manómetro, que estará listo para usar.
Instrucciones del kit de desconexión rápida Lightning de Thor (QDK001):
Paso 1: desconecte el terminal positivo de la batería de la batería del vehículo.
Paso 2: Corte las pinzas de cocodrilo de los cables del compresor dual Lightning Bolt True de Thor (tenga en cuenta qué cable es positivo y negativo con el uso de cinta adhesiva).
Paso 3: Pase el cable rojo (positivo) y el cable negro (negativo) del kit de cableado a la batería del vehículo o al accesorio de la carrocería (piso del área de carga trasera, terminales de la batería, etc.). NO CONECTE CABLES A LA BATERÍA.
Paso 4: Pele el aislamiento del cable rojo (positivo) aproximadamente 1/2” usando pelacables. Pele el cable positivo del compresor (marcado con cinta) aproximadamente 1/2”.
Paso 5: Tuerza el cable descubierto formando un hilo tanto en el cable rojo (positivo) como en el cable del compresor de aire. Coloque termorretráctil negro en ambos cables cerca del extremo. Engarce el terminal del conector del poste en ambos extremos del cable. Utilice termorretráctil según sea necesario para garantizar la protección contra los elementos.
Paso 6: Conecte los conectores de los cables del poste de alimentación usando el lado “+” (positivo) a los terminales del conector de polo tanto en el compresor como en los cables positivos del kit de cableado. Repita los pasos 4 a 6 para los cables negativos del kit de cableado y el compresor.
Paso 7: corte el cable rojo (positivo) en el compartimento del motor cerca de la caja de fusibles con un cortador de cables. Pele aproximadamente 1/2” de aislamiento de ambos extremos del cable rojo (positivo) usando pelacables. Tuerza el cable expuesto hasta formar un hilo. Desenrosque las tapas de plástico de los extremos del receptáculo para fusibles de 100 amperios provisto y deslícelas sobre los extremos del cable hasta el aislamiento. Coloque el cable en el receptáculo para fusibles de 100 amperios provisto y atornille firmemente los terminales al cable expuesto. Vuelva a atornillar las tapas de plástico en el bloque de fusibles. Utilice termorretráctil si es necesario antes de colocar el cable en el portafusibles.
Paso 8: Pele aproximadamente 1/2” del extremo del cable rojo (positivo) cerca del terminal de la batería. Coloque el termorretráctil negro sobre el extremo del cable. Tuerza el cable expuesto hasta formar un hilo. Coloque el cable en el terminal de cable plateado provisto. Engarce el cable firmemente en el terminal usando prensas para cables. Coloque el termocontraíble sobre la conexión del terminal y entráigalo en su lugar para protegerlo contra los elementos. Repita lo mismo con el cable negro (negativo).
Paso 9: Determine dónde colocar mejor el portafusibles en el compartimiento del motor (lado de la caja de fusibles) y atornille el portafusibles en su lugar con tornillos pequeños.
Paso 10: Coloque con cuidado el terminal en el terminal positivo de la batería y atorníllelo al terminal.
Paso 11: Encienda el vehículo y pruebe el compresor dual verdadero Lightning Bolt de Thor usando el interruptor de encendido en la parte superior del compresor.
Paso 12: ¡Muéstrales a todos tus amigos lo rápido que puedes ventilar!
Video instructivo de instalación del bastidor de cama modular Thor's Lightning Refuge
USE AT HOME & EXPAND CAPABILITY